Change Language: klicken Sir hier für Deutsch  clic aquí para español  cliquez ici pour français 
Everything about level indicators. Visit the Shop for all spare parts for level indicators FMN and FMK.
|| Home

|| Product
    description
    operation
    price list
    downloads

|| Shop

|| Contact
    possibilities
    imprint

News:


_________________

last Update:
- O P E R A T I O N -
1. Component parts
2. Contents
3. Application & Safety
4. Assembly
5. Adjustment
6. Exchange reset spring
7. Circuit diagram
8. Maintenance
_____________________________________________________________

Assembly

You can install this level indicator in any orientation provided it is adjusted appropriately (see chapter on adjustment).

Installation in silo walls: FMN 113 to approx. 10 mm
                                          FMK 508 to approx. 6 mm
Location:                            fitted tigthly to the inner wall

You will achieve this for thin-walled containers/silos by

  • applying additional gaskets and/or
  • adjusting the flange.

Warning: The fixing bolts must not project into the inside of the silo! This will avoid a possible accumulation of the filling material.
Warning: The level indicator must not lie in the filling flow of the material! This prevents damage to the level indicator and especially to the diaphragm.

The electrical conductions

  • to be installed on the outside wall of the silo,
  • insert into the housing of the level indicator by the tapped holes PG11.

Warning: Seal unnecessary tapped holes with plugs! This prevents the penetration of dust and humidity.

Installation pattern Explanation
Preferably granular, dusty filling material floury filling material A = level indicator

B + C = conduction, if necessary steel tube

Annex Installation with filter

 Installation at higher temperatures

allowed temperature materials in level indicator
max. 120°C Standard version:

  • Plastic tappet
  • BUNA-N diaphragms
max. 200°C exchange into:

  • Metal tappet
  • Viton diaphragms

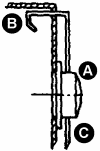
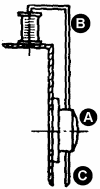
Installation with high pressure

With slightly high pressure:
Use a stronger spring. The level indicator will then functions perfectly.

With stronger high pressure:
Always manage a pressure balance between silo and indicator interior. You will reach pressure balance, if you:

  • install a steel tube,
  • attach the steel tube to the tapped holes PG 11,
  • install the conductions within the steel tube,
  • lock the rear cover of the level indicator FMN 113 hermetically.

Warning: Install a small filter at the end of the open tube, if you utilize the level indicator with granular goods. This protects from the material.

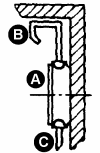
Installation with very coarse-grained and sharp edged filling material

Install a rejection device with

  • filling material with rough granulations,
  • filling material with sharp edges,
  • filling material with high density.

You'll find a diagram with explanations here.